
Estonia has a very interesting and rich textile tradition that deserves its own blog post. It may not be as well known as the famous Latvian mittens but nevertheless, there is actually even more to discover in Estonia if you are interested in textiles and especially knitting!
Folk costumes

To start with, once only has to have a look at the colourful folk costumes that are specific to each region of Estonia and which are an important part of the national identity and consciousness. We were lucky enough to visit during the 12th Youth Dance and Song Celebration ( XII noorte laulu- ja tantsupidu) which takes places every four to five years, alternating with the general Dance and Song Celebration which is a national institution. Through work I was able to attend the general rehearsal of the dancing celebration which was a truly impressive experience: almost 5000 children and young people dancing different traditional and modern choreographies and all in the different regional folk costumes. Such a beautiful, colourful, inspiring sight I can hardly describe it!
In the pictures you can see a small selection of the costumes I spotted in the parade that led up to the singing celebration but one of the most impressive things was the logistics of it: thousands of kids, some as young as 7 or 8 from all over the country travelled to Tallinn to sleep in schools and practise a whole week with their dance teachers to form this enormous dance celebration. Many of them were away from home for the first time without their parents and you could tell that the parents were extremely proud, watching them from the sidelines. In the stadion were the dance celebration was held it was most impressive how they managed to get the kids on and off the field on time and in order to be precisely where they were supposed to be. It involved a lot of running and sometimes I felt bad for the little ones. But everything went well and I have a lot of respect for the teachers to manage everything so well.
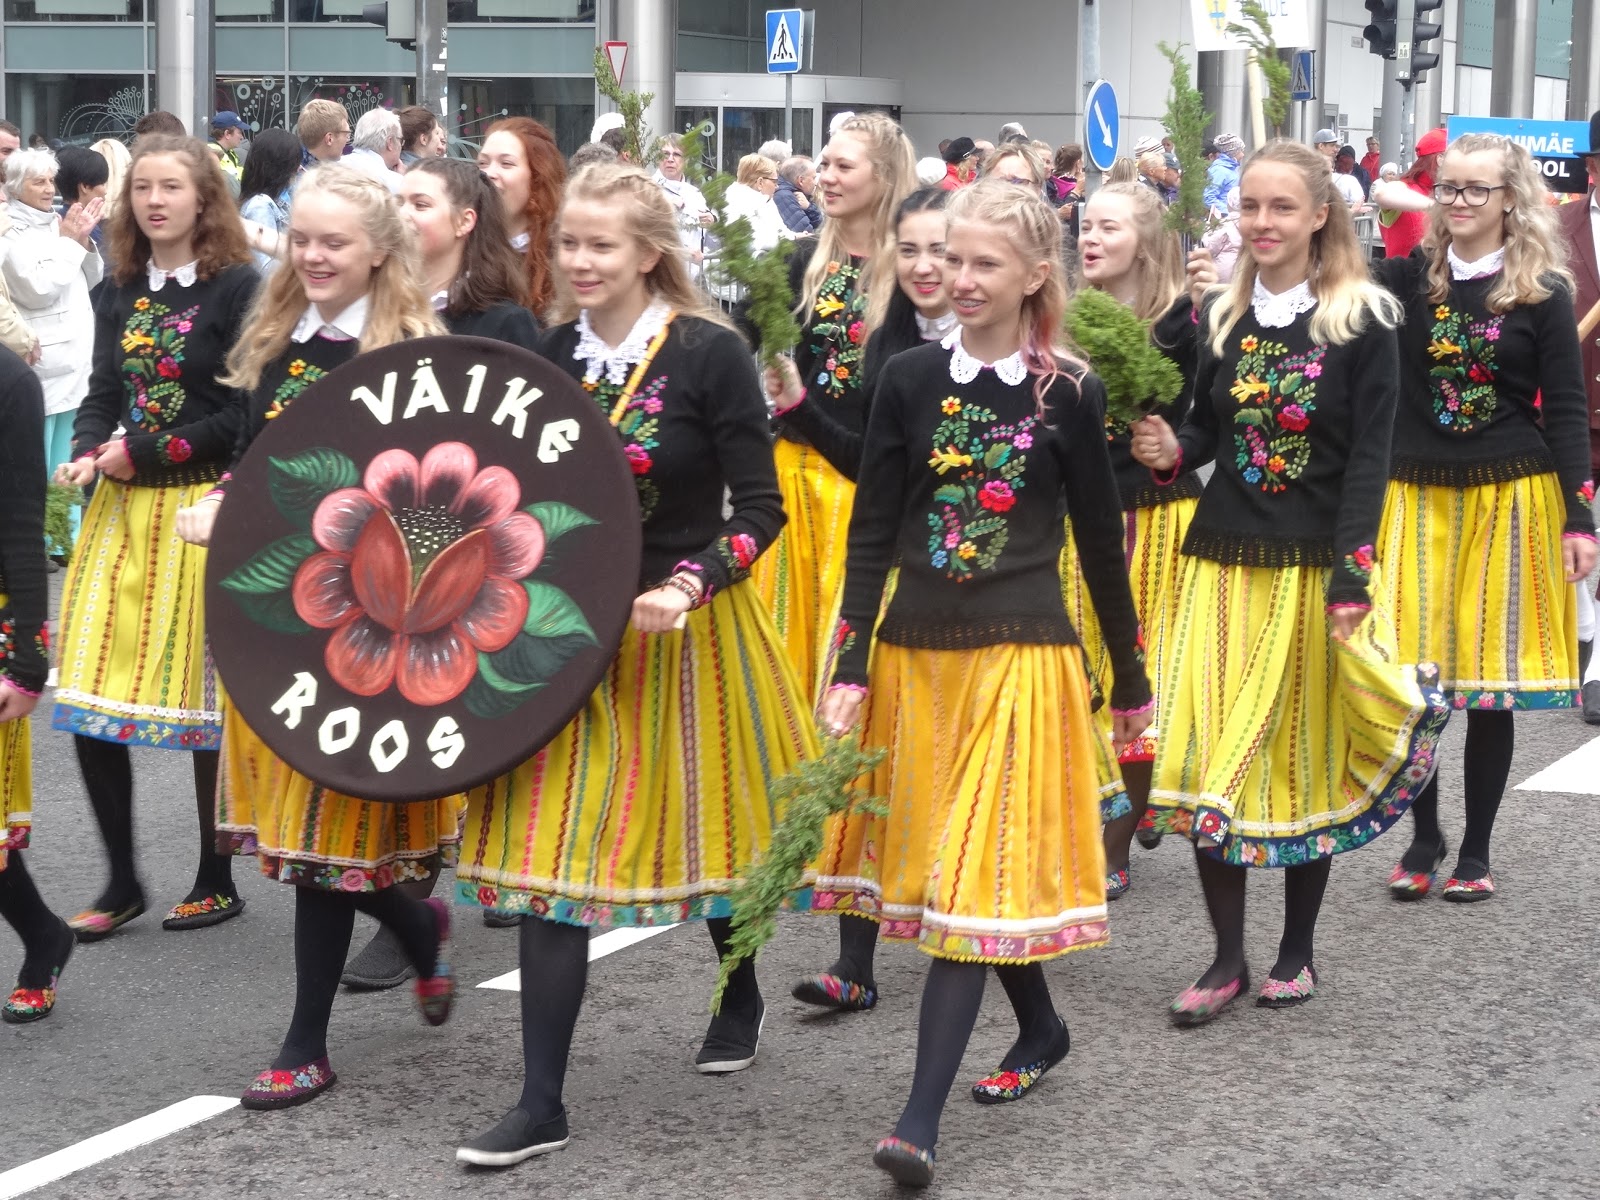


Anyways, I can definitely recommend attending one of the Dance and Song Festivals to get to know the Estonian culture and tradition better, even if it is only to look at the beautiful traditional costumes. Sometimes it was a bit too nationalistic for my taste but maybe that's just me as a German, for historical reasons I think we're often quite uneasy when too many flags are being waved around but I give it to the Estonians that their history is quite different in many ways!
Embroidery
As you can see in the pictures above, embroidery is one essential element in the beautiful designs of the costumes. Since we didn't travel to all regions in Estonia I will take as an example the traditional costume of the island of Muhu, which is also one of the most "spectactular" ones because the decorations are so lavish and the colours so vibrant and recognizable. Muhu also has a particular knitting tradition which I will describe in more detail below.
 |
| Joking around at Muhu museum: traditional costumes for both men and women |
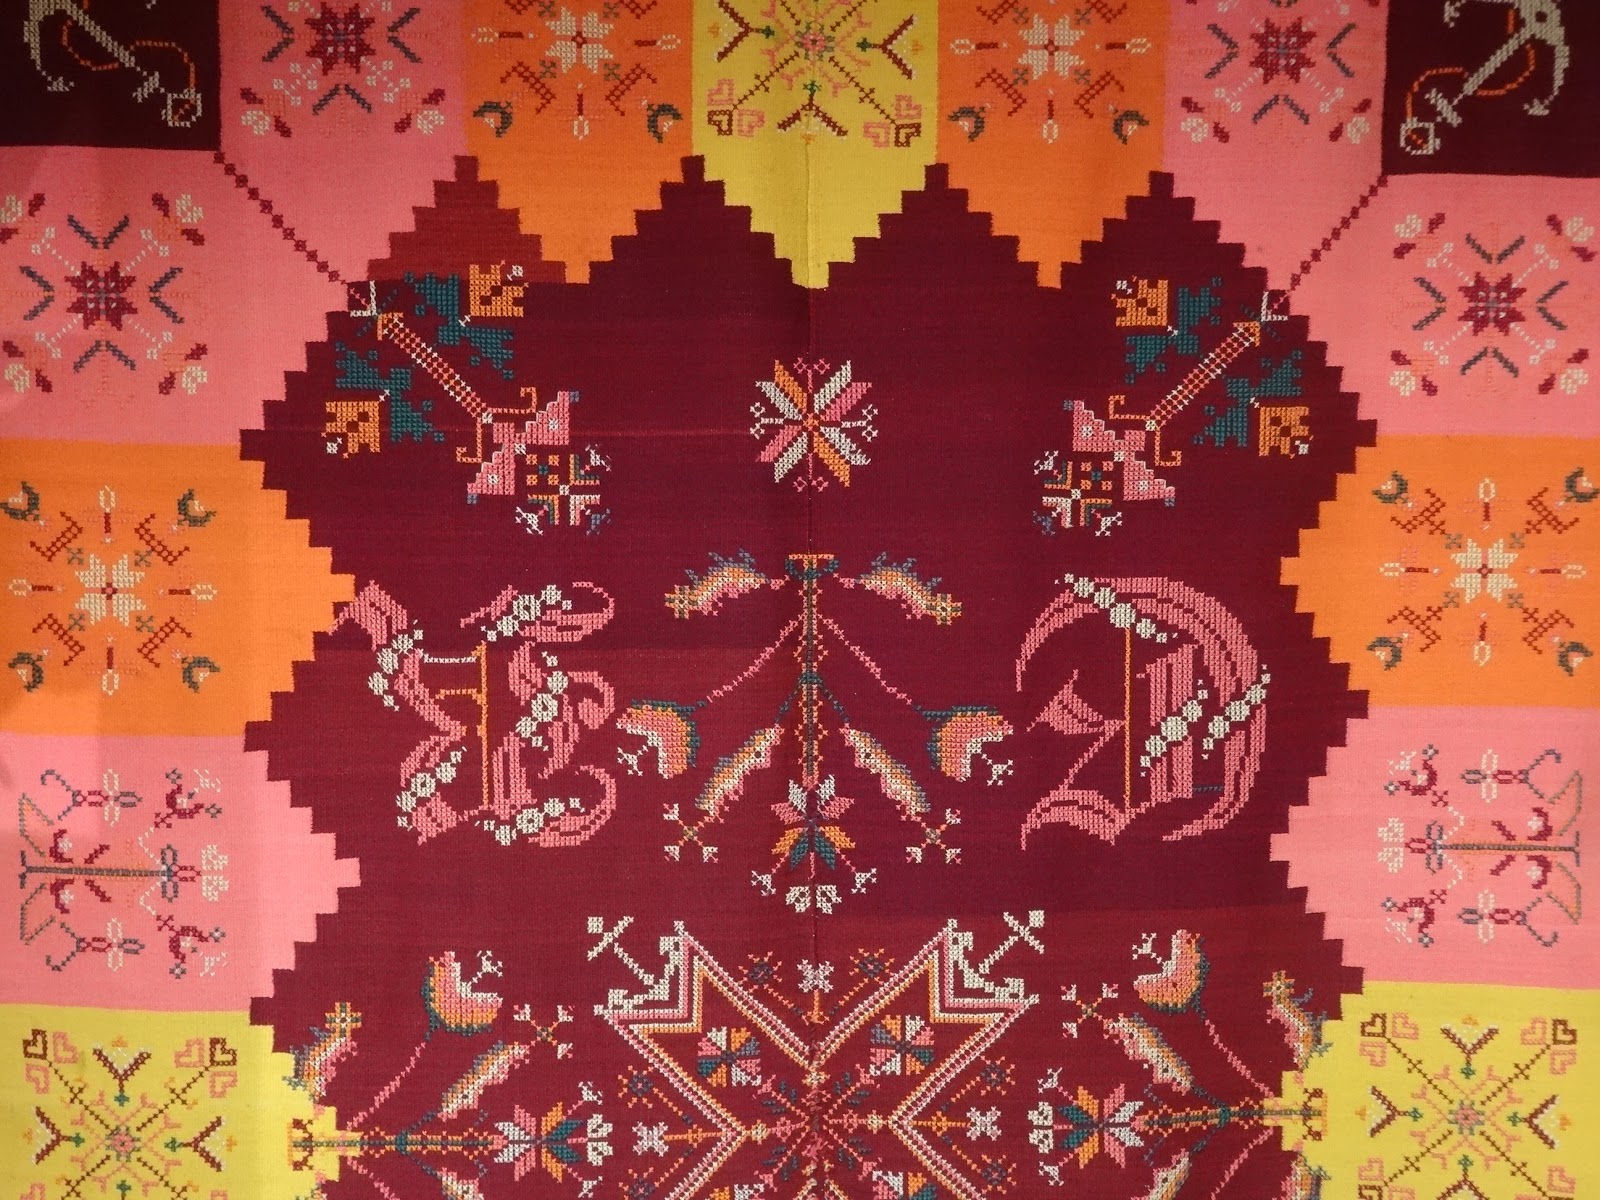
Muhu embroidery is famous for its intricacy and also for its colours, which are mainly orange, red, and pink as well as yellow for the woven fabric of the skirts (you can see this best in the picture above at the parade). We visited the Muhu museum which showcased some very nice examples of the embroidery both on the folk costume as well as on blankets and other textiles. Some are more geometric based patterns in cross-stitch such as the apron in the picture above and another tradition is the flower embroidery which is more free but equally beautiful. Unfortunately I'm not the expert on embroidery or folk costumes but I really recommend reading this blog post on the blog "Embroidery and Folk Costumes" which gives a lot of details and is a great resources.



Knitting
 |
| Handknitted mittens for sale in Tallinn |
 |
| I didn't know this book but it looks like the equivalent to the "Latvian Mitten Bible" |
Of course, knitting! When I arrived in Tallinn I immediately made a plan to go yarn shopping (see also details below) which led to Thomas' suspicion that I had only chosen to go to Estonia in order to fuel my addiction. Not true, but I did spend a fair amount looking at and shopping for yarn.
The Estonian knitting tradition is very rich and similar to its neighbour Latvia: multi-coloured patterns mainly used for mittens but also used for socks, hats, vests, sweaters, and other garments that are typical for each region. Since my mum is a regular visitor to Estonia she has often brought me books and yarn which I have already used in different projects such as this one or this one. One book that I liked in particular is Aino Praakli's "Kirikindad - patterned mittens" which is a great resource for traditional patterns, based on original mittens she documented in museums.
Knitting is everywhere in Estonia and many small towns have shops where local people can sell their handknit products for next to nothing - and they are beautiful! I was so tempted to buy a pair of mittens but I restrained myself because I already had 1.5 kg of yarn in my suitcase. Nevertheless it was a lot of fun to check out the colour combinations and styles.
The Estonian knitting tradition is very rich and similar to its neighbour Latvia: multi-coloured patterns mainly used for mittens but also used for socks, hats, vests, sweaters, and other garments that are typical for each region. Since my mum is a regular visitor to Estonia she has often brought me books and yarn which I have already used in different projects such as this one or this one. One book that I liked in particular is Aino Praakli's "Kirikindad - patterned mittens" which is a great resource for traditional patterns, based on original mittens she documented in museums.
Knitting is everywhere in Estonia and many small towns have shops where local people can sell their handknit products for next to nothing - and they are beautiful! I was so tempted to buy a pair of mittens but I restrained myself because I already had 1.5 kg of yarn in my suitcase. Nevertheless it was a lot of fun to check out the colour combinations and styles.
Muhu knitting


I'm picking the Muhu knitting as one example of regional styles, partly because we happened to go there and see the samples in the museum ourselves but also because it is one of the most beautiful ones.
Even within Estonia, the Muhu style sticks out because of its flashy colours and some typical pattern elements such as birds, plants, and certain geometrical patterns. You can see some examples in the book pictured above. What is also interesting are the stockings - because they are actually knee-high - which don't feature in all the Estonian regions but which seem to be typical for Muhu, too.
You can read more in Kate Davie's book review which has a lot of additional information which I wouldn't be able to cover all in one blogpost. (I'm actually not sure if she reviewed exactly the same book pictured above because I forgot to note down the title but I think it is.)
Even within Estonia, the Muhu style sticks out because of its flashy colours and some typical pattern elements such as birds, plants, and certain geometrical patterns. You can see some examples in the book pictured above. What is also interesting are the stockings - because they are actually knee-high - which don't feature in all the Estonian regions but which seem to be typical for Muhu, too.
You can read more in Kate Davie's book review which has a lot of additional information which I wouldn't be able to cover all in one blogpost. (I'm actually not sure if she reviewed exactly the same book pictured above because I forgot to note down the title but I think it is.)
Haapsalu lace


The second knitting style I wanted to highlight is the tradition of knitted Haapsalu lace shawls. It is very different from the traditional mittens and the Muhu style described above, and also probably "younger" since wikipedia defines the Haapsalu shawls as "a knitted lace shawl that originated in the seaside resort town of Haapsalu, Estonia during the early 19th century."
Indeed, we had the pleasure to visit the Haapsalu Lace Centre and check out some of the samples you can see above. Besides the fact that Haapsalu is a cute little seaside resort, the Lace Centre is an excellent place to learn about the shawl tradition and even learn how to knit one yourself! I'm personally not a big fan of lace so I skipped this opportunity but I think it would be a real achievement to finish one of those masterpieces - just to prove that you can!
Other crafts: woodwork


Finally, I can't really leave out another important Estonian craft which really impressed me: woodcarving and woodwork in general is everywhere. It kind of makes sense - considering that much of the country is covered with trees. But still, the skill is remarkable and I admired the smooth buttons and jewelry as well as the cutting boards and hand-woven baskets.
Especially the baskets made from birch bark are wonderful but unfortunately I couldn't take back as much wood products as yarn - airline luggage restrictions suck. But I couldn't entirely resist and bought a necklace and a bracelet similar to the ones pictured above.
The carved buttons totally made me swoon and they felt amazing but I decided against them because Thomas had already promised to make me some himself. Now, this will be a difficult challenge to live up to!
Especially the baskets made from birch bark are wonderful but unfortunately I couldn't take back as much wood products as yarn - airline luggage restrictions suck. But I couldn't entirely resist and bought a necklace and a bracelet similar to the ones pictured above.
The carved buttons totally made me swoon and they felt amazing but I decided against them because Thomas had already promised to make me some himself. Now, this will be a difficult challenge to live up to!
Useful addresses and information
 |
| Flyer of the Estonian Handicraft Association with the addresses of the different regional handicraft centres |
 |
| Map with the location of the regional handicraft centres |
I have to admit that I relied heavily on the information my mum collected on her extended trips to Estonia and then passed it on to me and she even wrote an own blogpost about it but unfortunately it is in German.
The two pictures above show a publication by the Estonian Handicraft Association (Eesti Käsitöö) which has its main centre in Tallinn and then local antennas in the different regions, as you can see on the map above. It's definitely worth visiting if you are looking for affordable handknits but they have only a smaller selection of yarn. The focus is on knitted products.
But of course there are also regular yarn shops and the ones that my mum recommended are actually all within 5 minutes walking of each other, very close to the new Tallinn bus station. Here I'm summarizing the addresses and directions for the Tallinn shops, translated into English:
The two pictures above show a publication by the Estonian Handicraft Association (Eesti Käsitöö) which has its main centre in Tallinn and then local antennas in the different regions, as you can see on the map above. It's definitely worth visiting if you are looking for affordable handknits but they have only a smaller selection of yarn. The focus is on knitted products.
But of course there are also regular yarn shops and the ones that my mum recommended are actually all within 5 minutes walking of each other, very close to the new Tallinn bus station. Here I'm summarizing the addresses and directions for the Tallinn shops, translated into English:
- Karnaluks (K.A. Hermanni 1, Tallinn, Entrance C)
- Abakhan Fabrics (Tartu mnt. 63, Tallinn)
- Wool and Woollen (Tartu mnt. 60 d, Tallinn)
If you happen to travel to Estonia and you want more knitting-related advice feel free to get in touch!


