Search This Blog

Showing posts with label dye. Show all posts

Monday, 31 July 2017

Little knits: Alpaca baby vest


 My friends are busy making babies which, in return, keeps me busy knitting for them. As mentioned before, I like to those little knits and they're real stashbusters because I almost always have a spare skein or two that are perfect for those projects.

This time I stuck to my trusted old pattern for the "Raglan Baby Cardigan (Top-Down)" which I already used several times, for example here. It's a free Ravelry pattern and in its simplicity you can modify it endlessly. The yarn I used was still from my Peru stash of alpaca yarn, part of it handdyed in the workshop on dyeing with natural dyes I attended two years ago.

I'm not a huge fan of pink normally, mainly because of the gender stereotyping-aspect of it, but this one is very pretty. It's dyed with cochenille but came out a bit more subdued because the alpaca didn't take up the dye as well as the wool.

As an afterthought I should have probably given the pink cardigan to a boy in order not to conform with the stereotypes but alas, I wasn't that rebellious after all and it went to a little girl. I'm a bit reassured though because I think there aren't too many other pink items in her wardrobe so she can grow up with a healthy take on gender identity.

*******
Pattern: Raglan Baby Cardigan (Top-Down)
Yarn: Michell alpaca, natural white & dyed with cochenille


Wednesday, 7 June 2017

Dyeing speckled yarn


Another yarn dyeing experiment and a very successful one indeed! As there has been somewhat of a recent hype (if you can call it like that in the micro universe of indie knitters, spinners, and dyers) about speckled, gradient, and marled yarn I have to admit I have also been affected. Pretty pictures on ravelry and instragram do not help, either, and so I suddenly felt the urge to try and dye some speckled yarn myself. For those who are not part of above-mentioned universe: "speckled" refers to small splashes and bits of colour in an otherwise naturally white or uniformely coloured yarn. Some nice examples that I like can be found here or here

As one nowadays does, the first step to starting my project was googling a good tutorial. I found this one by "Fiber Artsy" and it seemed pretty straight forward, so I followed it. I only adjusted a few steps, such as mordanting with alum and using textile dye instead of KoolAid (sadly not available in Belgium). To show what I did exactly I summarized it step-by-step below:


Preparation


I used a 100 % wool yarn which I think was treated to be "superwash" but really nothing special. It was already wound in skein so I had to unwind it to be able to dye it (see picture above). I used my swift but honestly, I think it would have been faster by hand. Except that I was missing a second pair of hands. Anyway, the swift did the job.


Mordanting


As in my previous dyeing experiments (with rhubarb root and with avocado)I used alum as a dye agent, which is potassium aluminium sulfate. You can buy it easily in a good arts supply shop or in a classic "droguerie" such as "Le Lion" in Rue de Laeken in Brussels. It's not dangerous to use but it is a chemical substance so it's better to take precautions and definitely do not use it in a normal cooking pot! Any old pot will do, provided it is big enough and preferably made of steel so that it doesn't leak anything into the dye bath. In the picture above you see I'm using en emaille pot which is actually not the best but the biggest I have. It's important that the yarn is floating freely, otherwise it felts very easily and your yarn is ruined.

 I used a solution based on 10 % alum based on the dry weight of the yarn, in this case it was 10 g of alum to ca. 2 l of water. However, I think less would also work so next time I'll reduce the amount. In my workshop on dyeing with natural ingredients, we used citric acid as a mordant which can be bought in the supermarket. Vinegar solutions can also work but usually bring out less vibrant colours than chemical mordants like alum (saying that, technically all mordants are "chemicals", even if they occur naturally because they all start a chemical reaction. But I leave it up to the experts to make a proper distinction between the natural vs. chemical discussion).


Preparing the yarn for the dye


I used our kitchen for the dyeing procedure but I made sure everything was wrapped safely with cling film to avoid splashing the dye everywhere (not healthy). I also wore plastic gloves, which is the reasons why most of the pictures look very dodgy! In order to get the yarn ready, I removed it from the mordant bath after ca. 15 minutes, let the yarn cool down and removed access liquid by letting it drip off over the sink and gently pressing the yarn. Again, don't be too rough and don't hold it under cold water because that will cause it to felt.


Let the fun begin!

After spreading out the still humid yarn on the tray, finally I could start the fun. I used the textile dye pictured above which is pretty standard dye that you can use also for bigger dyeing projects, including in the washing machine. It's the first time I used this kind of powder dye so I had no idea what to expect. I basically did it the same way as the KoolAid was used in the tutorial: I sprinkled some of the dry powder onto the yarn but the effect was not visible at once. Then I became a bit more adventurous and dissolved small quantities of the powder in water and started splashing the dye over the yarn with a paint brush. In the end I even just "painted" the yarn with the brush directly to cover bigger surface areas. I used red, yellow, green, and blue dye.

I turned the yarn around several times to makes sure most areas were covered. For that, the skein has to be bound together very loosely, otherwise you have white stripes where it is gathered too tightly. Mine was maybe a little too loose, which resulted in my skein almost disintegrating in the end. So something in between those two situations would be ideal. 

Fixating the colours

Sorry, no pictures of this stage. Again I followed the tutorial on the website and it worked like a charm. I wrapped the skein into cling film and put it into an oven dish. I put it in the microwave, first 1 minute at a time to test, three times, and then 5 minutes. So 8 minutes in total. The dish did get hot and so did the yarn inside the film so I think it's better to check regularly because I don't know how easily the yarn can catch fire. When I thought it was done, I removed the yarn from the cling film and let it cool down. I then rinsed it in the sink to see if there was any excess dye coming out but it was almost nothing. 


The result

The result was way better than I had expected. Beautiful colours, gradients of all kinds, and more or less evenly distributed! I was surprised that the dye which were only the primary colours, merged so nicely and created this whole spectrum of different shades, as you can see above. 


Of course, some sections are better than others and in some places there is a bit too much dye. I didn't distribute the colours very evenly, which results in some very intense colour-blotches. Next time I would probably use less dye in general and fewer colours, leaving the natural white as the dominant colour. I like the yarns that only have a few highlights, but I'm always so tempted when I start the process. Less is definitely more in this kind of dyeing process, though.


Monday, 30 November 2015

Rhubard root dye


After my first experiment with avocado dye and following the great workshop on dyeing with plants this summer I decided to try one of the recipes at home. I really liked the colours that we got from working with rhubarb root, especially when we did a test with an older dye bath (already a bit smelly and covered in mould) which gave a very surprising dark red instead of the orangy-yellow of the fresh bath. While I didn't manage to recreate quite the exact colour it was still a nice result.

I got a whole root - which is huge, by the way - and chopped it up in very small pieces. I then left them outside in the sun to dry for a few days until they were really hard and felt like wood. I wanted to preserve them for future dye-projects and my freezer was to small for these quantities of root-chips.  I think the result is the same but maybe the colours are a bit more vibrant with the fresh root.

I used my hand-spun yarn (the first attempt ever so excuse me if it looks more like a rope than actual knitting yarn) and I divided my skein to be able to work with different shades. I also used alum for mordanting as I did with the avocado because I forgot to buy the citric acid - less "natural" but it worked just as well. As you can see, the first dye-bath resulted in a  much darker, mustard yellow shade.

The second dye-bath produced a lighter shade of yellow but had patches of much more orangy colours as well. I wonder if it had turned into something even more reddish if I had left it longer?

Now it's just the question: what to knit with this unreasonably chunky yarn?

Finally, a note to myself: When dying yarn in cooking pots on the kitchen hob next time, wash them properly and stash them FAR away from actual cooking pots. I'm not sure how poisonous alum is but the boyfriend was definitely not happy when he noticed that he had been cooking (and eating) spaghetti from a pot that I had mordanted my yarn in.... and I was worried that I might have damaged his health permanently. My bad!

Friday, 24 July 2015

Dyeing yarn with natural dyes


After my initial stint at dyeing yarn with avocado pits for the knitting competition earlier this year I was very motivated to continue exploring this new hobby and registered for a workshop at the "Jardin des plantes à couleur" in Namur. The cool thing is that the garden is actually a place to educate people (definitely not only children) about which plants can be used for dyeing and how this works so they grow all the plants themselves; the workshop was one of the activities they organise.

I found it especially intersting because it was advertised as a workshop of "dyeing wihtout mordants" which is, strictly speaking, not actually true. As the instructor explained it is rather working with natural mordants that occur either within the plant or is added but is not too chemical. The lines are obviously blurry here because what actually happens with the plants is still a chemical process, even if you use natural products. But the point was not to use any of the more agressive mordants such as alum which I used in my first home-dyeing attempt.

The workshop took the whole day and initially we were planning on dyeing 1 kg of yarn each in 10 different dye baths but we reduced the quantity to 500 g with 10 skeins à 50 g to speed up the process a little bit. It turned out still to be an intense 8-hour day with only a short lunch break but the result is magnificant and I'm super happy I did it to understand the processes a little bit better.

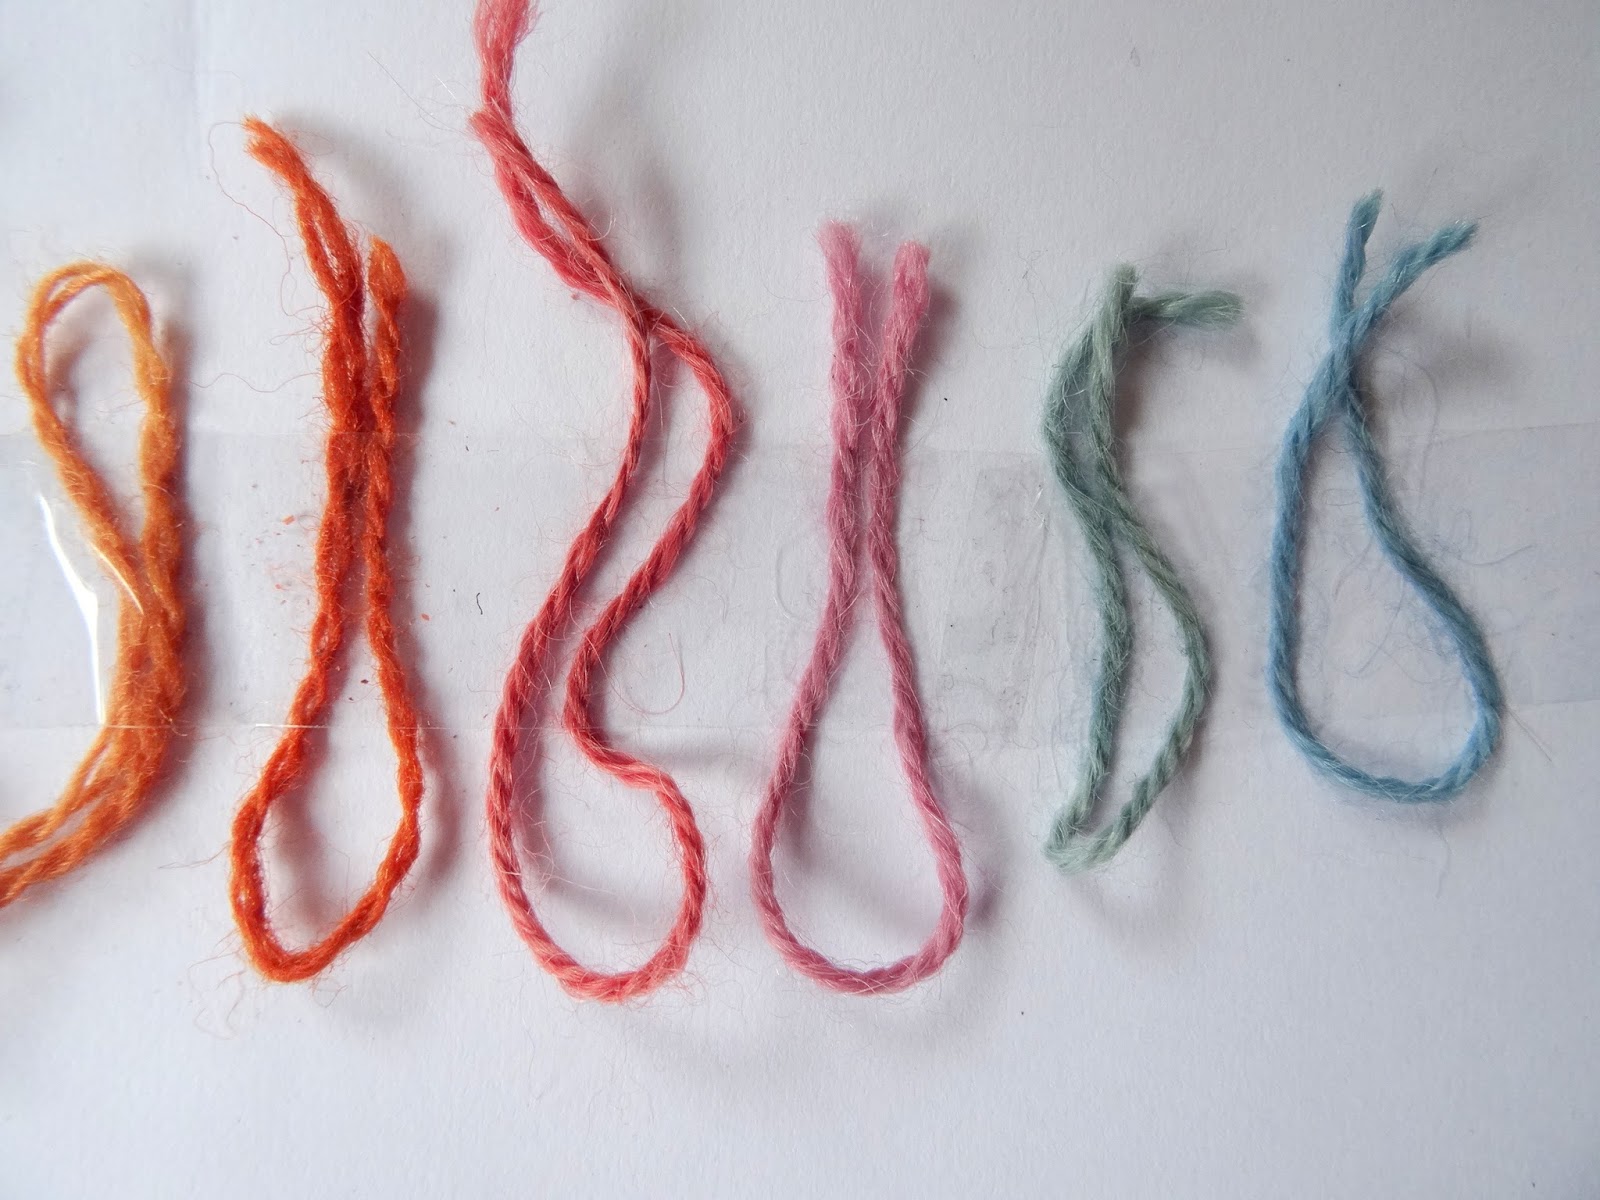
We worked with dye made from cochenille (little bugs - lice actually - that are dried and ground), indigo (a powder made from plant seeds), onion peel, rhubarb root, walnuts, and madder root. We ended up with a whole rainbow of colours, the shades depening on the yarn used and how long the yarn was being soaked. For the walnut, the cochenille, the indigo and the rhubarb we used the bath for a second dye and the colours came out quite differently, if even more beautifully.

The recipe we used was very basic: for however much of the dye material we used we added 20 % green tea (just the normal one from the chinese supermarket) and 10 % citric acid. While the latter ingredient was bought in powder form, the instructor explained that you can also just add lemons but for the amount needed it would be quite a lot so it is actually easier to use the concentrate.

The only exception was the indigo which was much more complicated. I have to admit that I probably won't try that again at home, even though the blue was beautiful. Still, I liked using the everyday materials such as onion peel and walnuts which also gave amazing colours and I already started collectinng all my onion peels from cooking. I got a lot of good ideas and I'm excited to start experimenting again in my own kitchen!

Monday, 2 March 2015

My first time: dyeing yarn with avocados

As mentioned in my last post, I wanted to try something new for the knitting competition. If this is a very wise decision (i.e. trying something new which is quite likely to go wrong when you actually really need it to work out!) is a different question. But I read a lot on the internet about natural dyeing and it intrigued me, especially because the yarn that we are supposed to use for the competition is undyed. A little colour never hurt anyone is my motto! To sum up my experience in one sentenced: my very first time dyeing with avocados was a total fail, the second time round it worked like a charm.


But while I'm sitting here and wondering if the fumes of potassium sulfate solution are potentially poisonous I have to say it has been an interesting experiment. First of all I chose avocados to dye with because they're easily available and it seemed like you don't necessarily need an additional mordant (but I ended up using one anyways). It's also supposed to make a lovely pink/purple colour like this example shows - how mine ended up will be explained later on. 

Avocado dye, part I (the fail):

So first of all I took four avocado pits and chopped them up in little pieces which was surprisingly easy. The funny thing was that as soon as they were cut open they already started oxydising and turned bright orange, quite surprising. I also kept the peel because supposedly you can make dye from it, too, but that's for a later experiment. I know it looks like I'm preparing some yummy guacamole but no, it's science! 


 I added some hot water and after a few minutes the colour turned orange as you can see on the pictures below. This was with two pits including the skin around it (I wasn't sure if I was meant to put it in or not).


This is the colour of the mix after about 12 hours of soaking without any additional ingredients (left) and
 after 48 hours, adding two more pits after about 24 hours (right).


After having soaked the chopped up pits in water for about 24 hours I then filtered out the pits, putting them separately into a sock (yes, a sock, old but clean I may add) so that the pieces wouldn't get tangled in the yarn. I heated up the dye solution and I added the yarn that I had previously soaked in the mordant while simmering for about 1 hour on the hob. I paid attention that it didn't get to boil to avoid felting. After about 1 hour in the dye bath, the yarn had soaked up almost all the dye but unfortunately the colour was almost invisible! Even after rinsing and drying the yarn you could only detect the slightest little hint of pink, nothing like the nice, rich hue I had seen on pictures before. Meh. 

Here's a picture of what the yarn looked like after the first dyeing attempt:


After this total fail I tried to figure out what I did wrong. I concluded that it was probably because I didn't boil the avocado pits properly but only soaked them, which means that I didn't extract enough of the dye from the pits to dye the yarn properly. Or, alternatively, I used bad avocados because they were not quite ripe yet (on the pictures you can see that they're very green on the inside). On the upside it was easy to overdye the first attempt since it was basically still the natural wool colour and I decided to try again. So.....

Avocado dye, part II (the success):

This time I changed my approach a little. First of all, I bought some avocados that were already over-ripe, if not to say on the verge of rotten. The market vendor at Marché du Midi probably thought I was totally stupid when selling me about 8 avocados that were basically not edible anymore but little did he know that I didn't buy them for eating, ha! And I was happy to buy dyeing material for only 1 € - a win-win situation. Peeling the lot was a bit disgusting because some of them were already kind of slimey-grey inside and partly mouldy. But it worked, so I'm not complaining.

The second thing that I did differently this time (and this might be the most important factor) is that I chopped up the pits just like before but I put them straight into the pot with water and boiled them for about 1 hour on the hob. The water turned a lot darker immediately, almost the colour of mulled wine instead of the more orange hue it had before when I used the mason jar as you can see here:


The rest of the process was the same: I mordanted (is that even a word?!) the yarn again - even though I wasn't sure if this was necessary - and put it into the dye to let it soak. I  let it simmer on the stove for about 1 hour, which seems to be the magic timeframe in this process for everything, and then let it sit there over night until the next morning. That would be about 10 - 12 hours of soaking I guess. The yarn kept on floating to the top and since I wanted it to be all covered I put a little cereal bowl upside down on top of the yarn to push it down. It worked well and didn't leave any traces on the fibre. 

The next morning I witnessed my first avocado-dye-yarn-miracle and it was beautiful! Even after rinsing several time almost no dye came out, it seems to be very well absorbed by the yarn. Here is the result:


To sum up this excruciatingly long post: using over-ripe avocados and boiling them on the hob does the trick and sometimes, if you don't succeed, you just have to try again. Another lesson in life learned. And here are the technical details again:

- pits of ca. 8 small avocados chopped up in smaller pieces
- used a bit more than the recommended 10 g alum to mordant 100 g of yarn
- boiled the dye base for about 1 hr
- added the yarn and simmered it in the dye bath for 1 hr
- let the yarn soak in the dye bath over night, ca. 12 hrs

Let me know if you're trying this and how it turns out!