Search This Blog

Showing posts with label making stuff. Show all posts

Friday, 5 January 2018

2017 knitting review


  • The favourites:


Looking back over my past blogposts, I think the Praline cardigan and the Birki cardigan really stick out - Praline because it was fun to knit a garment which was constructed differently from my usual go-to patterns and Birki because it's just so comfy and pretty and I've worn it a lot (amongst others on my Estonia/Finland trip). And of course I loved the Palmetto cardigan, I've been wearing it all the time this winter because it still fits me quite well during pregnancy - we'll have to see if I have to make some adjustments later on.


  • The small stuff


I also knitted a lot of smaller items, especially baby stuff, that went to various friends who had babies this year. Many of them I forgot to document properly before giving them away and a couple of them are not posted yet but the pink alpaca vest was one of those projects. Good practice for knitting our own baby clothes!


  • The one-off


Another project which I enjoyed a lot was knitting the Tailwind shawl with my hand-dyed "confetti explosion" yarn. In hindsight, the speckled yarn fad was exactly that: a fad. I'm still using the shawl if I need a bit of colour in the grey winter weather but honestly I'd rather stick to the boring old plain colours in the future, or at least a combination thereof.


  • The loser

Clearly, this was the "Yellow sweater". Even though I knitted it in my favourite Létt Lopi, the yellow never really matched the one in the pattern and, who am I kidding, I just don't do sweaters! The idea was to convert it into a cardigan eventually but I never got round to doing it. I'm also not convinced of the yoke shaping, it's a bit too wide for my taste. 

  • The unfinished

My "Delft" cardigan. Even though we visited Delft in the summer this did not boost my knitting mojo enough to really get down with this project. Actually, it was WAS finished at some point but the neckline was messed up and far too wide so I still have to unravel parts of the yoke. Urgh, I don't even want to think of those tiny stitches....


  • The one that didn't survive


Oh, and last but not least one item that did sadly not survive 2017: my "Green Tweed" cardigan got accidentally shrunk in the washing machine. At least I got a lot of wear out of it before we parted, and I have to admit that it was my own fault it got destroyed. I usually washed it in the wool cycle but in moment of confusion I told Thomas to put it in the 40 degree wash with all the other stuff - oops.


  • What's next? 

For 2018 I foresee a lot of baby knitting - if I manage to do any knitting at all! I still have some dream projects that I want to tackle but to be honest I prefer to wait until my body is back to its post-pregnancy shape (keeping my fingers crossed that my old stuff will still fit eventually!). But hey, you can always dream, for example of:

- Siri - still top of my list, second year in a row!
- Another Miette - such a nice and easy pattern and fits really well
- Minetta - I already got the yarn waiting and it's soooo tempting
- Tabular - even though I don't like sweaters this pattern got my fingers itching

Happy knitting 2018!

Monday, 31 July 2017

Little knits: Alpaca baby vest


 My friends are busy making babies which, in return, keeps me busy knitting for them. As mentioned before, I like to those little knits and they're real stashbusters because I almost always have a spare skein or two that are perfect for those projects.

This time I stuck to my trusted old pattern for the "Raglan Baby Cardigan (Top-Down)" which I already used several times, for example here. It's a free Ravelry pattern and in its simplicity you can modify it endlessly. The yarn I used was still from my Peru stash of alpaca yarn, part of it handdyed in the workshop on dyeing with natural dyes I attended two years ago.

I'm not a huge fan of pink normally, mainly because of the gender stereotyping-aspect of it, but this one is very pretty. It's dyed with cochenille but came out a bit more subdued because the alpaca didn't take up the dye as well as the wool.

As an afterthought I should have probably given the pink cardigan to a boy in order not to conform with the stereotypes but alas, I wasn't that rebellious after all and it went to a little girl. I'm a bit reassured though because I think there aren't too many other pink items in her wardrobe so she can grow up with a healthy take on gender identity.

*******
Pattern: Raglan Baby Cardigan (Top-Down)
Yarn: Michell alpaca, natural white & dyed with cochenille


Wednesday, 13 July 2016

Something in the mail


A late birthday present from my mum came in the mail the other day: the first issue of Carrie Bostick-Hoge's "Making" magazine! I don't think I would have bought it "just like that", the price is almost the same as for a book (20 USD + 14 USD shipping!!) but if it's a gift I can of course accept it :).

I mainly wanted it for the "Marigold cardigan" knitting pattern because I had seen it on Ravelry before it was published and it was the perfect pattern for my stash of white alpaca yarn that I had been hoarding since my trip to Peru last year. The day I got the magazine in the post I started swatching and I've already made some good progress.

It's a bit of a  patience test to knit with this almost lace-weight yarn but I'm still enjoying it. Also, I have promised myself to knit AT LEAST three patterns from the magazine to make it worth it and I also love Carrie's "Branches and buds" jumper which is high on my to-do list. Although I think I'll make it a lopi-style cardigan with the leftover yarn I still have in my stash - but that's for the next project!

Friday, 24 July 2015

Dyeing yarn with natural dyes


After my initial stint at dyeing yarn with avocado pits for the knitting competition earlier this year I was very motivated to continue exploring this new hobby and registered for a workshop at the "Jardin des plantes à couleur" in Namur. The cool thing is that the garden is actually a place to educate people (definitely not only children) about which plants can be used for dyeing and how this works so they grow all the plants themselves; the workshop was one of the activities they organise.

I found it especially intersting because it was advertised as a workshop of "dyeing wihtout mordants" which is, strictly speaking, not actually true. As the instructor explained it is rather working with natural mordants that occur either within the plant or is added but is not too chemical. The lines are obviously blurry here because what actually happens with the plants is still a chemical process, even if you use natural products. But the point was not to use any of the more agressive mordants such as alum which I used in my first home-dyeing attempt.

The workshop took the whole day and initially we were planning on dyeing 1 kg of yarn each in 10 different dye baths but we reduced the quantity to 500 g with 10 skeins à 50 g to speed up the process a little bit. It turned out still to be an intense 8-hour day with only a short lunch break but the result is magnificant and I'm super happy I did it to understand the processes a little bit better.

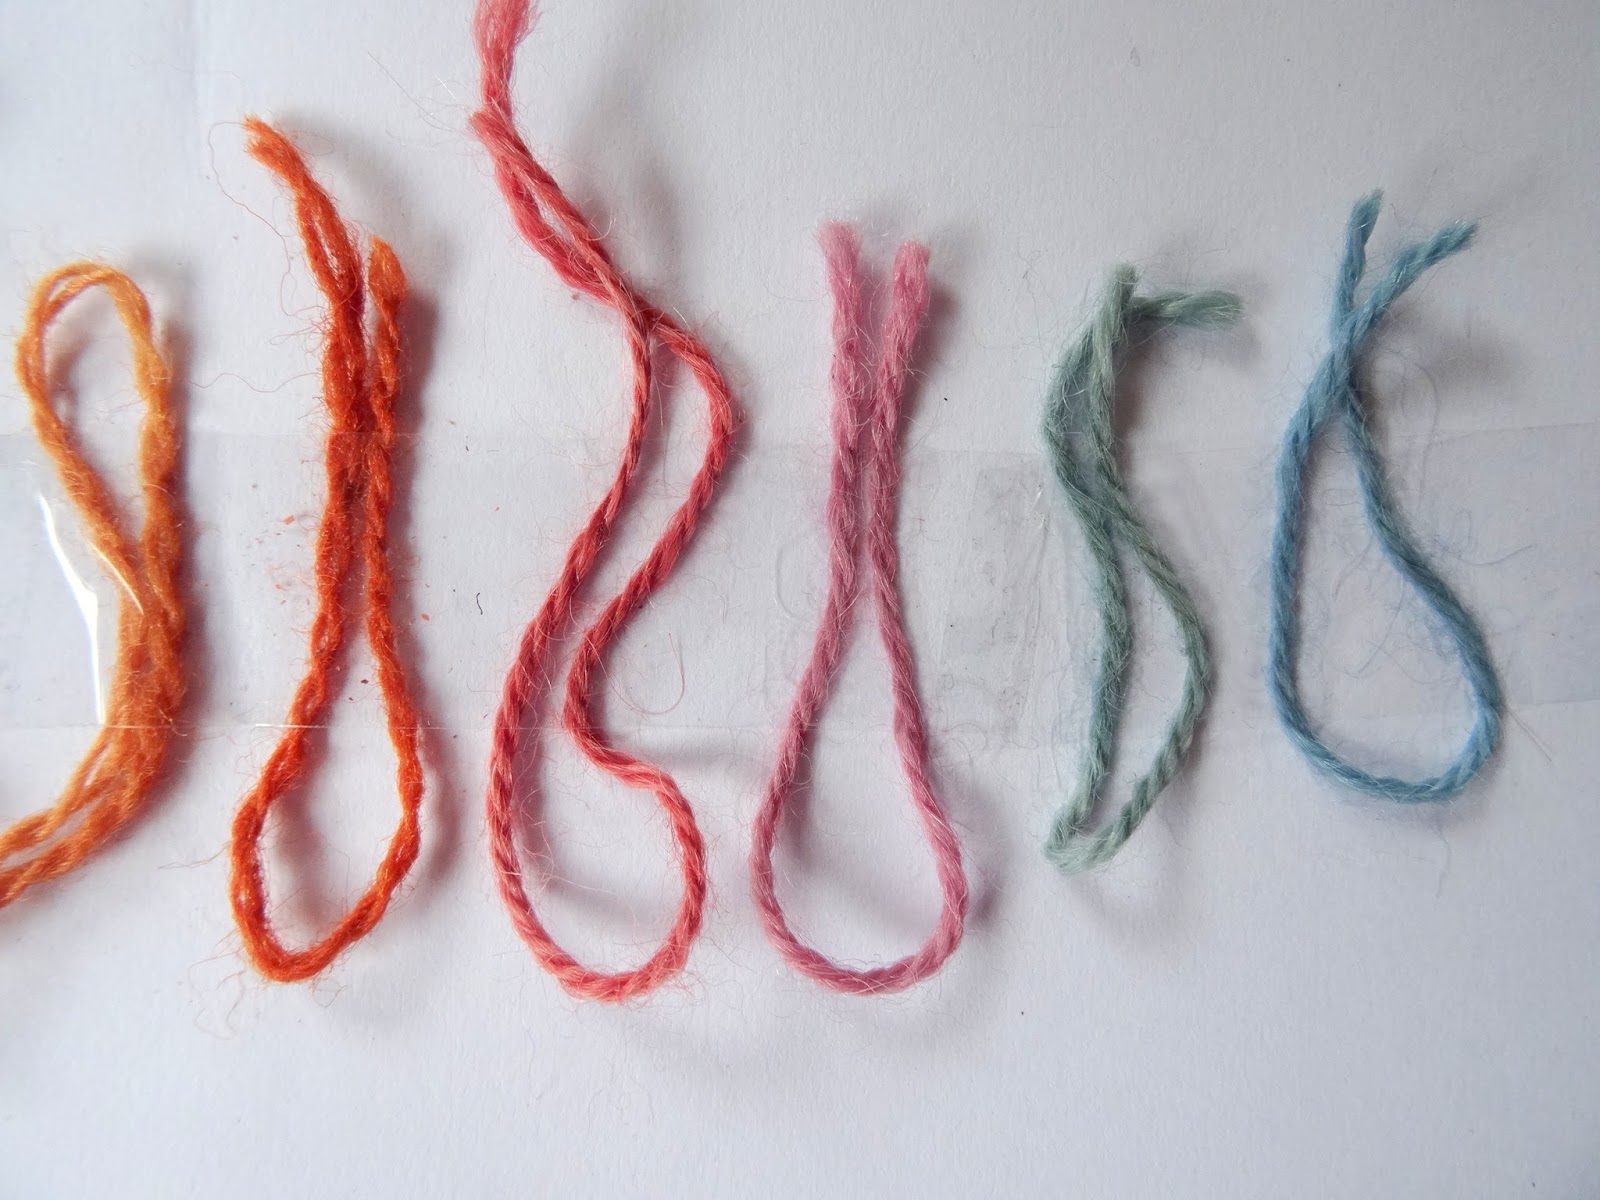
We worked with dye made from cochenille (little bugs - lice actually - that are dried and ground), indigo (a powder made from plant seeds), onion peel, rhubarb root, walnuts, and madder root. We ended up with a whole rainbow of colours, the shades depening on the yarn used and how long the yarn was being soaked. For the walnut, the cochenille, the indigo and the rhubarb we used the bath for a second dye and the colours came out quite differently, if even more beautifully.

The recipe we used was very basic: for however much of the dye material we used we added 20 % green tea (just the normal one from the chinese supermarket) and 10 % citric acid. While the latter ingredient was bought in powder form, the instructor explained that you can also just add lemons but for the amount needed it would be quite a lot so it is actually easier to use the concentrate.

The only exception was the indigo which was much more complicated. I have to admit that I probably won't try that again at home, even though the blue was beautiful. Still, I liked using the everyday materials such as onion peel and walnuts which also gave amazing colours and I already started collectinng all my onion peels from cooking. I got a lot of good ideas and I'm excited to start experimenting again in my own kitchen!

Sunday, 22 March 2015

My entry to the knitting competition

 And here it is, my entry to the knitting competition that I blogged about earlier this year! It's not completely my brainchild (ha, see what I did there) but I got inspiration from this ravelry project and I think it turned out quite nicely. The colour of the  avocado-dyed yarn works really well and I even had some left after I finished the stuffing. I hope they won't be too harsh on me concerning the anatomical correctness of my model but I truly did my best.

If you want to know more about the technique that I used to make the "i-cord" folds of the brain please see below, otherwise enjoy the pictures:


While I was happily blogging away about dye-related experiments and various FOs I almost forgot that I still have to prepare my entry for the knitting competition! For some reason I had it in my head that the deadline was at the end of April but yesterday I got an e-mail reminding me that it has to be finished in 10 days. Panic! 

Of course I already had an idea in mind at it involved the avocado-dyed yarn that I prepared a few weeks ago. But again I made the mistake of wanting to be innovative by using a knitting mill. For those who don't know what this is: basically an advanced version of the good old "Strickliesel" that most of us made acquaintance with ca. anno 1991 in Mrs Sander's textile creation class in primary school. This contraption is supposed to be a time saving and easy solution to produce large amounts of knitted cords that can be used for all kinds of stuff. It is supposed to be.

In a rush (because no time) I borrowed the knitting mill from a lady in my Stitch'n'Bitch group who was kind enough to give it to me and I started filing the thread. The instructions were simple enough and if I understood the principle as a six-year-old surely it can't be that complicated, can it? YES IT CAN! While almost driving me crazy with constantly piling up the thread at the top and blocking the tube it I almost got into a fight with the boyfriend when he tried to get involved with his "engineering skills" (a.k.a. a genuine but not very highly appreciated attempt to help me de-clutter the yarn mess). 

After several attempts, some torn thread, a lot of swearing and  only minimal results I was close to giving up for my own peace of mind. But because I didn't really have any other alternatives I managed to get at least some of the cord done (with a lot of prodding and with the help of a crochet hook), hoping it would be enough.  It was not fun! I didn't even remember to take pictures because I was just happy that I finished the stupid cord. My verdict: the knitting mill is a product designed in hell and it hasn't helped me an itsy tiny bit, it only cost me nerves.

Despite all the technical problems I finished the project in time and sent off the application. Now I can just sit and wait and keep my fingers crossed in the meantime. Wish me luck!

Pattern: "Dream Factory" by Alicia Williams
Yarn: Coccinelle natural yarn; dyed by myself

Saturday, 14 February 2015

Be my Valentine

I don't care about Valentine's Day of course, even me who has a little romantic streak has realized that it's a way to sell more flowers, chocolate and expensive dinners. But coincidentally I just finished this lovely red cowl yesterday and I thought it fitted the theme quite well so I called it the "Be my Valentine" cowl, mainly because of the colour. 

This was just one of those "I need to do something inbetween bigger projects because otherwise I feel like I never finish anything"-projects and I'm officially still working on my "Marius" jumper. It turns out to be a bit trickier than expected because the pattern is, even with all my imagination, very cryptic and lacks a lot of information. 

One of the problems was for example that the pattern didn't state where to do the increases for the sleeves. It's difficult to integrate them into the pattern without messing it up but I suppose I just have to improvise again. I also had to read up on how to avoid the annoying "jump" in the pattern where the rounds join. I found some good ideas but it sucks that you always have the jog which makes the pattern look wonky.

I'm getting there though, the bodice and one sleeve are already finished so I'll post some more pictures here soon. Have a lovely Valentine's Day or rather, as the Finnish call it, ystävänpäivä (Friendship Day), doing lovely things with your lovely friends!


Pattern: Chunky brioche stitch cowl by Diana Levine
Yarn: Katia Merino Grosso, colour 12


Monday, 2 February 2015

From the sewing archives

I think I mentioned before that I'm more of a summer-sewing and winter-knitting person, although this will hopefully change soon with my new craft corner including a proper table to work with and additional lighting (currently the biggest limitation to my sewing activities). Anyway, I still have a few projects that I wanted to post but never found the time to do it, especially because summer = time to be outside and enjoy the sunshine and not sit at home and write a blog!

The patterns I used for the projects pictures below were very simple and basically all variations of either the tunic from the Marimekko "Surrur" book or from "Tuniques pour petits et grands" which I bought in FNAC a while ago.The fabrics were bits and pieces that I bought at the flea market (the dark green one with the polka dots), IKEA (the white one with the abstract floral pattern) and the Marimekko outlet shop in Helsinki (the blue one with the raindrops).

Everything is super easy to sew and perfect for a beginner like me. The simple cuts bring out the fabric's colours and patterns nicely - as you may have noticed I LOVE colours! And since I know that you like looking at silly pictures of me I have included an extra-silly one in the end, just in case you get bored.


Tunic with short sleeves in IKEA fabric, white with colourful pattern
 Pattern: Tunic from the Marimekko "Surrur"book
Fabric: IKEA

Tunic from the book "Tuniques pour petits et grands" in the Marimekko patterned fabric, blue with colourful raindrops
Pattern:  From the book "Tuniques pour petits et grands"
Fabric: Marimekko

Dress with peter pan collar and fabric from the flea market, green with light green polka dots

Dress with peter pan collar and fabric from the flea market, green with light green polka dotsDress with peter pan collar and fabric from the flea market, green with light green polka dots

Pattern: From the Marimekko "Surrur"book (+ added Peter Pan collar)
Fabric: Flea market